

Creating a functional podcast studio in a small bedroom or apartment corner is more achievable than many beginners assume. A standard desk with the right dimensions and layout can comfortably support a microphone boom arm, audio mixer, laptop, monitor, and headphones without requiring expensive custom furniture. The key is choosing a compact desk that offers at least 30 inches of depth and 55 inches of width for most practical setups, prioritizing stability and cable routing over specialized "studio" labeling.

This approach, often called a studio-in-a-box, lets budget-conscious creators repurpose versatile furniture while still achieving professional-looking results. By focusing on ergonomic placement, gear weight distribution, and simple organization tricks, you can build a repeatable recording space that fits your room constraints and workflow.
Why Standard Desks Work Well for Small-Room Podcasting
Most aspiring podcasters start with a laptop, USB microphone or boom arm, small audio interface or mixer, and headphones. These items do not require a massive custom-built desk. A well-chosen standard desk provides enough surface area while leaving room for movement in tight spaces like bedrooms or shared apartments.
Government ergonomics resources emphasize fitting the workstation to the user rather than forcing awkward positions. CDC ergonomics guidance recommends arranging equipment to support neutral posture and reduce strain, which applies directly to podcast setups where you may sit for long recording or editing sessions. Similarly, OSHA workstation guidance highlights the importance of neutral body positioning when arranging monitors, keyboards, and peripherals.
In small rooms, the desk becomes the foundation of your entire creator workflow. It must hold steady when you adjust a mic arm or type notes, route cables cleanly to avoid clutter, and fit within limited floor space without dominating the room.
Thresholds: How to Choose the Right Desk Size and Features
Not every desk works for podcasting. Practical thresholds help you quickly filter options during your search for a podcasting desk or home studio desk.

A good starting point is 30 inches of depth as the practical minimum for most setups involving a mic arm, mixer, and monitor. Shallower desks around 24 inches can work for laptop-only recording with minimal accessories, but they quickly feel cramped once you add a boom arm clamp and external gear. For comfort and future-proofing, aim for 36 inches deep when possible.
Width follows a similar logic. A 48-inch desk can handle a stripped-down solo setup, but 55 to 60 inches offers better balance for a centered monitor with side-mounted gear. Wider options around 72 inches become ideal if your podcasting desk setup includes note-taking space or dual-purpose editing.
Load capacity matters for stability. Look for desks rated at least 50 pounds for light podcast gear, but 75 pounds or more provides safer margin when adding monitor arms or heavier mixers. Cable management features such as rear grommets, under-desk trays, or channels turn from nice-to-have to essential once multiple devices are plugged in.
These thresholds are heuristic guidelines modeled from common podcast gear footprints. Exact fit still depends on your specific mic arm clamp style, monitor stand depth, and whether the desk sits against a wall.
Small-Room Podcast Setup: When a Standard Desk Is Enough vs When Specialized Furniture Is Worth It
Relative fit scores for choosing between a standard desk and specialized podcast furniture in small-room scenarios.
View chart data
| Category | Standard desk fit | Specialized furniture fit |
|---|---|---|
| Very tight room, low budget, multi-use | 5.0 | 1.0 |
| Small room, moderate budget, flexible layout | 4.0 | 2.0 |
| Small room, high stability need, fixed layout | 2.0 | 4.0 |
| Dedicated podcast corner, higher budget | 1.0 | 5.0 |
| Dedicated podcast room, premium setup | 1.0 | 5.0 |
Illustrative scenario matrix derived from the requested decision criteria: room multi-use, budget, stability needs, and layout flexibility. Scores are heuristic/relative, not measured performance data. Higher values indicate better fit for the scenario.
Comparison Framework: Standard Desks vs Specialized Podcast Furniture
The biggest information gain for most buyers is realizing that the decision rarely comes down to "podcast desk" versus "regular desk." Instead, evaluate based on your room's actual constraints and how permanent your recording setup needs to be.
A scenario-based framework helps here. Standard desks usually win in multi-use rooms, tight budgets, or when gear changes frequently. They offer flexibility and lower cost while still supporting core podcast needs when chosen with the thresholds above in mind.
Specialized podcast furniture tends to justify its premium when your corner is dedicated, the mic arm and mixer stay installed permanently, and you value built-in cable channels or accessory mounts that reduce daily setup time. The crossover point often occurs around moderate-to-high stability needs in a fixed layout where wobble during recording becomes noticeable.
This framework prevents overpaying for features you won't use. As shown in the chart above, standard desks score highest in very tight, budget-conscious, multi-purpose scenarios that match many student or renter setups.
Common Myths About Podcast Studio Furniture
Several misconceptions can lead new creators to buy the wrong pieces or expect too much from furniture alone.
Myth 1: You need specialized studio furniture to sound professional. Reality: Most successful solo podcasters use standard desks. What matters more is mic placement relative to your mouth, room treatment for reflections, and consistent recording habits. Furniture alone rarely improves acoustics significantly.
Myth 2: Heavier desks are always more stable. Reality: Stability comes from leg design, bracing, and floor leveling more than sheer weight. A lighter but well-engineered desk can feel more solid than a heavy one that flexes under arm pressure.
Myth 3: Any large desk will work for podcasting. Reality: Size without the right depth and cable access creates clutter and awkward reaches. A too-small or too-shallow surface forces constant rearranging that disrupts your flow.
Myth 4: A studio-in-a-box kit solves all setup problems. Reality: These solutions simplify purchasing but still require testing for your specific gear and room. They work best as a starting point rather than a complete turnkey fix.
Correcting these myths helps you focus buying decisions on measurable factors like surface area, stability under load, and workflow fit.
How to Build Your Studio-in-a-Box Layout
Start by measuring your available space, including clearance for chair movement and door swings. Position the desk so the microphone arm clamps securely without hitting walls. Place your monitor slightly below eye level and keep the mixer within easy reach without stretching.
Cable management reduces both visual clutter and accidental tugs on sensitive audio gear. Use grommets, adhesive clips, or under-desk trays to keep wires organized. Official cable management advice treats this as a practical step to improve workspace usability.
For stability, test the desk by gently bumping the edge or adjusting the mic arm while recording a short test. If it wobbles noticeably, consider adding felt pads, corner braces, or a thicker top surface. Resources on improving flat-pack furniture stability offer simple reinforcement ideas that work well for creator setups.
Acoustic treatment deserves separate attention. While furniture placement can minimize problematic reflections, bare walls and hard surfaces in small rooms often need absorption panels or blankets. University guidance on room acoustics notes that thoughtful placement and materials help control unwanted echoes.
Ergonomics and Comfort Checks for Long Recording Sessions
Podcast work often involves extended sitting. Arrange your setup so forearms stay parallel to the floor when typing or using the mixer, and your monitor sits at arm's length. Discomfort is usually a signal that the layout or habits need tweaking, according to NIOSH discomfort guidance.
Choose a supportive chair and consider a footrest if your desk height feels too high. Take regular breaks to stand and stretch. These small adjustments often matter more for long-term comfort than the desk model itself.
Important comfort and setup disclaimer: This article discusses furniture selection and ergonomic workspace arrangement for creator comfort only. It does not constitute medical advice, diagnosis, or treatment. Desk choice and setup cannot replace professional ergonomic evaluation. If you experience persistent discomfort, eye strain, or have existing health conditions, consult a qualified healthcare or ergonomics professional.
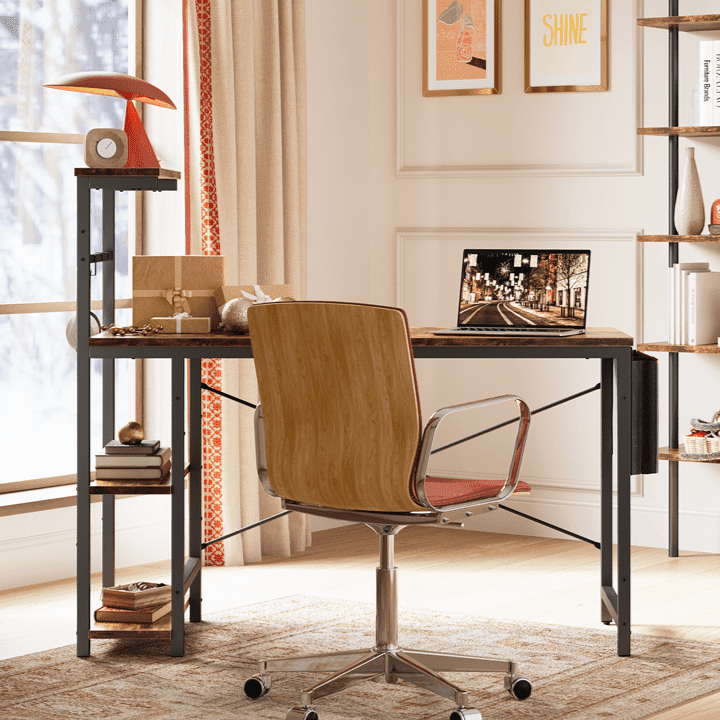
Recommended Desk Features and a Practical Example
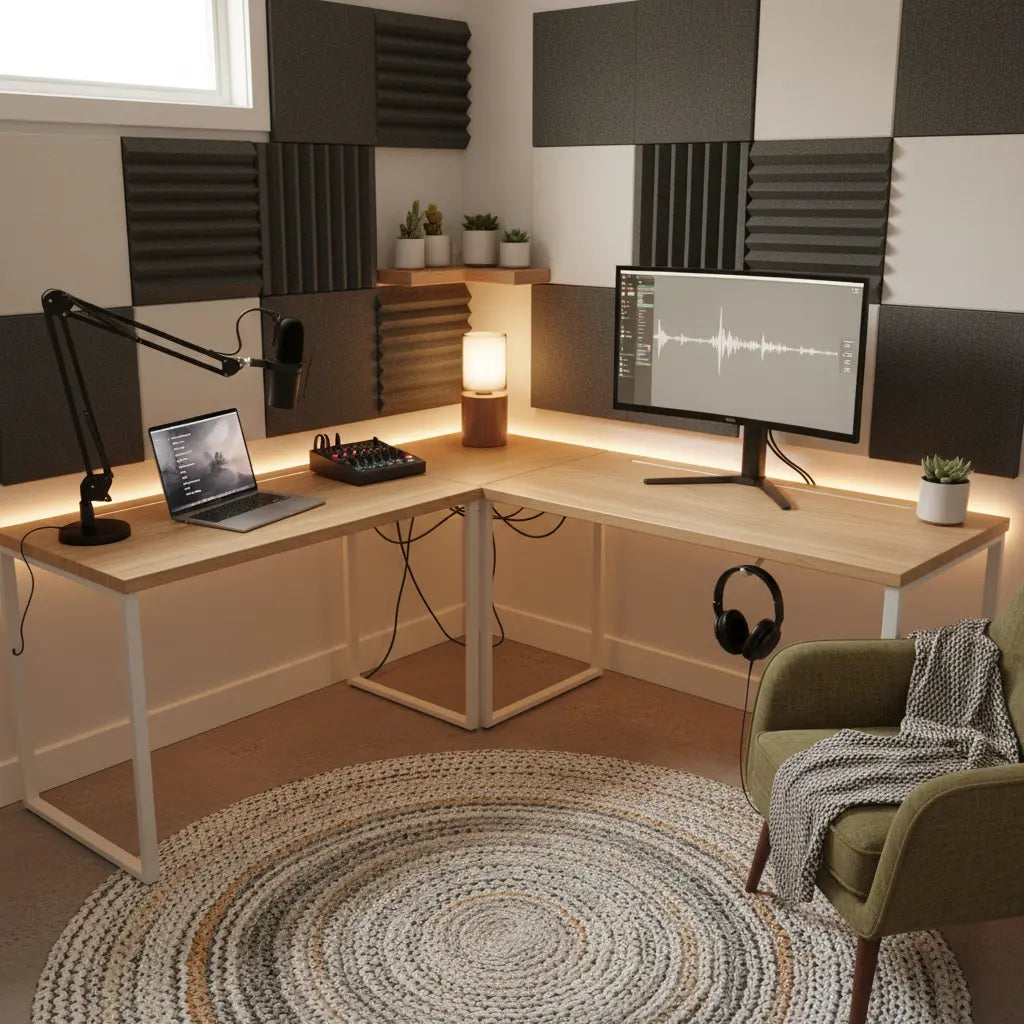
Look for desks with power outlets or USB ports built in, adjustable monitor stands, and accessory hooks for headphones or cables. Reversible L-shaped designs or corner models with shelves maximize small bedrooms by providing multiple surfaces without expanding the footprint.
For example, an L-shaped gaming desk with integrated power, LED lighting, monitor stand, and storage shelves can double effectively as a podcasting desk setup. The extra surface lets you keep the mixer and notes on one wing while recording on the main section. Models with these integrated features simplify reaching a clean, functional studio-in-a-box without multiple separate purchases.
When shopping, verify actual measurements rather than relying on marketing labels. Test cable routing in person or via detailed product diagrams if buying online.
What to Check Before Buying and Common Regrets to Avoid
Use this quick checklist before purchasing:
- Measure your space and mark the exact footprint the desk will occupy.
- Confirm depth of at least 30 inches and width suited to your gear layout.
- Check load rating and test for wobble if possible.
- Verify rear or under-desk cable access.
- Ensure the clamp area for your mic arm is thick enough and accessible.
- Consider future expansion: will the desk still work if you add a second monitor or speakers?
Common regrets include buying a desk that is too shallow for comfortable arm placement, choosing aesthetics over stability, or ignoring cable management until the wires become unmanageable. Renters especially benefit from lightweight, tool-free assembly options that can move easily if needed.
Final Thoughts on Creating Your Compact Podcast Studio
A studio-in-a-box using standard furniture delivers excellent value for most beginner and intermediate podcasters working in small rooms. By applying the size thresholds, scenario framework, and practical layout tips outlined here, you can create a functional, comfortable workspace without overspending on specialized gear.
Remember that the desk is only one part of the equation. Pair it with proper mic technique, basic acoustic treatment, and good recording habits for the best results. Start simple, test your setup thoroughly, and upgrade only the elements that create real friction in your workflow.
Your compact podcasting corner can feel professional and inspiring with the right furniture choices. Focus on what actually improves your recording experience rather than chasing perfect studio aesthetics, and you'll build a setup you'll actually use consistently.
This guidance is based on practical ergonomics principles, common creator setups, and real-world small-space constraints. Results depend heavily on your specific room dimensions, chosen gear, and personal workflow preferences.