

Summary
Creating an effective remote teacher desk setup in 2026 requires a strategic balance between ergonomic health, multi-peripheral technology integration, and organized access to physical teaching aids. By utilizing an L-shaped desk to create distinct "zones" for instruction and administration, educators can maintain a professional virtual classroom that maximizes engagement while minimizing physical strain during extended teaching sessions.
Key takeaways
- Zonal Organization: Use the corner of an L-shaped desk as your primary teaching interface to maximize reach and visibility, separating "live" instruction from "prep" and administrative tasks.
- Ergonomic Longevity: Prioritize adjustable monitor heights and sit-stand transitions to mitigate the risks of musculoskeletal disorders associated with the 6-8 hour stationary periods common in modern remote education.
- Peripheral Management: Implement advanced cable routing and powered USB hubs to manage the 4-5 devices (webcams, mics, lights, document cameras) essential for a high-quality 2026 virtual classroom.
- Pedagogical Backgrounds: Design your background with depth and subject-specific functionality, ensuring lighting is optimized for both facial clarity and physical demonstrations.
- Material Safety: Ensure your workspace meets indoor air quality standards by selecting furniture that complies with CARB Phase 2 and EPA TSCA Title VI regulations.
Designing Your Virtual Command Center: The L-Shaped Advantage
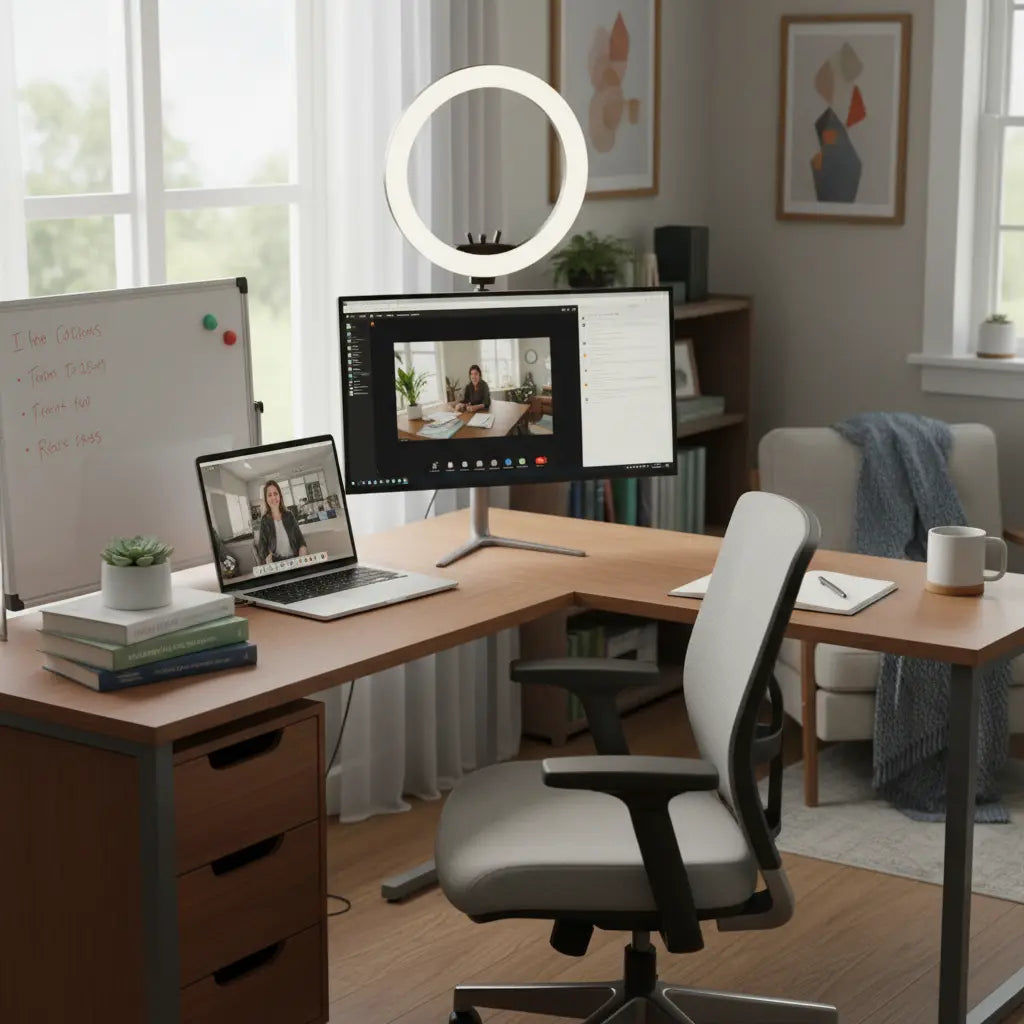
Transitioning from a traditional classroom to a home environment often involves significant space constraints. For many educators, the primary challenge is creating a professional-grade studio without sacrificing an entire room. The L-shaped desk has emerged as the gold standard for this "cloffice" or small-office evolution because it naturally facilitates a zonal workflow.
In an L-shaped configuration, the corner serves as the "Instruction Zone." This is where your primary monitor, webcam, and microphone reside. By positioning yourself in the vertex, you gain immediate access to both wings of the desk. One wing can be dedicated to "Administrative Tasks"—grading, lesson planning, and email—while the other serves as the "Resource Zone," holding physical props, whiteboards, and textbooks. This separation is crucial for mental context-switching and maintaining a clutter-free environment during live sessions. For those working in particularly tight quarters, exploring space-efficient desk layouts for home offices can help you fit a full-scale virtual classroom into a bedroom corner or alcove.
Logic Summary: The zonal approach assumes that a teacher's workflow is split between high-focus live instruction and low-focus administrative work. By physically separating these tasks on an L-shaped desk, we reduce cognitive load and improve the "readiness" of the teaching space.
Ergonomics for the Long Haul: Protecting Your Health in 2026
Remote teaching in 2026 is more stationary than ever. Unlike a physical classroom where you might move between desks or the whiteboard, virtual teaching often keeps you tethered to a 24-inch radius for hours. According to the Occupational Safety and Health Administration (OSHA), prolonged computer use without proper ergonomic support can lead to significant neck, back, and wrist strain.
To combat this, your setup must prioritize adjustability. Your primary monitor should be positioned so the top third of the screen is at eye level, preventing the "tech neck" associated with looking down. If you use multiple screens, optimize your workspace with dual monitor desk setups to ensure you aren't constantly twisting your neck to see student chat windows while presenting. Furthermore, consider a sit-stand desk or a height-adjustable converter. Alternating between sitting and standing every 30-60 minutes has been shown to improve circulation and energy levels, which directly translates to better classroom presence.

The Tech Stack: Optimizing Hardware for Engagement
The quality of your virtual classroom is often judged by the clarity of your video and audio. In 2026, students expect a "broadcast-quality" experience. This requires more than just a laptop's built-in camera.
Webcam and Lighting Placement
Standard advice suggests placing your webcam at eye level. However, for dynamic teaching—such as showing a science experiment or a math problem on paper—you need a camera mounted on an adjustable boom arm. This allows you to quickly pivot the camera from your face to your desk surface. Lighting should follow the "three-point" principle: a primary key light (like a ring light) positioned slightly to one side of the camera, a fill light on the opposite side to soften shadows, and a backlight to separate you from the background.
Audio Clarity
Audio is arguably more important than video. If students can't hear you clearly, they will disengage. A dedicated USB cardioid microphone, placed 6-12 inches from your mouth, is essential. Avoid using built-in laptop mics, which pick up fan noise and keyboard clicks.
| Feature | Lecture Mode | Demonstration Mode |
|---|---|---|
| Primary Camera | Eye-level webcam | Boom-mounted document camera |
| Lighting | Front-facing ring light | Overhead softbox |
| Audio | Cardioid USB Mic | Wireless Lavalier (if moving) |
| Screen Use | Presentation/Slides | Live-feed of physical props |
Organizing the Chaos: Managing Teaching Aids and Supplies
A teacher's desk is never just a computer desk; it's a storage unit for the tools of the trade. From puppets for primary education to complex models for secondary sciences, these items need a home that is reachable but out of the camera's view.
Vertical storage is your best friend. Use desk-mounted shelves or pegboards to keep frequently used items like markers, pointers, and timers at arm's length. For heavier materials, an L-shaped desk with storage for teaching materials provides the necessary drawer space to hide lesson plans and grading folders. If you find yourself overwhelmed by the sheer number of small items, adopting organization strategies for focused teaching sessions can help create a "low-friction" environment where everything has a designated spot, reducing the "where did I put that?" panic during a live stream.
Mastering the Tangle: Advanced Cable Management for Educators
One of the most overlooked aspects of a professional setup is cable management. A typical 2026 teacher setup includes:
- Laptop/PC power
- Primary Monitor
- Secondary Monitor
- Webcam
- Microphone
- Ring Light
- Document Camera
This "octopus" of cables is not just an eyesore; it's a safety hazard and a source of electromagnetic interference for your audio. Use under-desk cable trays to house power strips and excess cord lengths. Label both ends of every cable so you can troubleshoot quickly if a device fails mid-lesson. A powered USB hub is also a critical investment, ensuring all your peripherals receive consistent data and power without taxing your laptop's ports.
Logic Summary: We recommend a "hide and label" strategy. Hiding cables reduces visual clutter (improving focus), while labeling ensures that technical difficulties can be resolved in seconds rather than minutes.

The Backdrop: Creating a Pedagogically Sound Background
Your background is part of your teaching persona. It should be clean, professional, and relevant. Avoid "flat" backgrounds where you are leaning against a white wall; this looks unprofessional and creates harsh shadows. Instead, pull your desk at least 2-3 feet away from the wall to create "depth of field."
Consider the subject you teach. A language teacher might have a small, neatly organized "word wall" in the background, while a history teacher might feature a curated shelf of books or a map. The key is to avoid distractions. If you use a green screen or a virtual background, ensure your lighting is perfectly even to prevent the "shimmering" effect around your hair and shoulders, which can be highly distracting for students.
Safety and Stability: Choosing the Right Materials
When selecting the foundation of your virtual classroom, stability is paramount. A wobbly desk is amplified on camera, making every keystroke look like an earthquake to your students. Look for desks with steel frames and reinforced joints.
Equally important is the health safety of the materials used in your furniture. Many budget desks use engineered woods that can off-gas formaldehyde, a known respiratory irritant. In a small home office with limited ventilation, this can lead to headaches and fatigue. It is essential to choose furniture that is certified for low emissions. For a deep dive into these regulations, you can read the Engineered Wood Safety: A Comprehensive Guide to CARB & TSCA Standards, which explains how CARB Phase 2 and EPA TSCA Title VI standards protect your indoor air quality. When you explore L-shaped desk options for teaching setups, always verify that the manufacturer provides these safety certifications.
Virtual Classroom Daily Setup Checklist
Before hitting "Start Meeting," run through this quick checklist to ensure a smooth session:
- [ ] Lighting: Are your primary and fill lights on? Is there a glare on your glasses or monitor?
- [ ] Audio: Is the correct microphone selected in your software? Run a 5-second test recording.
- [ ] Background: Is there any "personal" clutter (laundry, dishes) visible in the frame?
- [ ] Peripherals: Is your document camera or secondary monitor powered on and ready?
- [ ] Ergonomics: Is your chair at the correct height? Is your water bottle within reach?
- [ ] Software: Are all unnecessary tabs and notifications closed to save bandwidth and prevent distractions?
FAQ
What is the best desk for online teachers with limited space? The best desk for online teachers in small spaces is typically an L-shaped desk or a "cloffice" (closet-office) setup. An L-shaped desk allows you to utilize corner space that is often wasted, providing two distinct work surfaces—one for teaching and one for prep—within a compact footprint. Ensure the desk features vertical storage or built-in shelving to keep your teaching aids off the main work surface.
How do I organize teaching supplies on a small desk without it looking cluttered? To organize supplies on a small desk, prioritize verticality and "hidden" storage. Use desk-mounted pegboards for frequently used items like markers and pointers, and utilize under-desk drawers or file cabinets for lesson plans and grading materials. Keeping the main desk surface clear for your laptop and mouse is essential for maintaining a professional appearance on camera.
Where should I place my webcam for the most professional look? Your webcam should be placed at eye level or slightly above to create a natural, "face-to-face" perspective for your students. If you use a laptop, consider a laptop stand or an external webcam mounted on a monitor. For teachers who do physical demonstrations, an adjustable boom arm is recommended so the camera can be quickly repositioned to show your desk surface.
How can I manage all the cables from my teaching peripherals? Effective cable management involves using under-desk trays to hide power strips and bundling cables with Velcro ties. Labeling both ends of each cable (e.g., "Webcam," "Mic") allows for rapid troubleshooting. Using a powered USB hub can also consolidate multiple device connections into a single port on your computer, reducing the number of cables trailing across your desk.
Are there specific safety standards I should look for in a teacher's desk? Yes, you should look for desks that meet ANSI/BIFMA standards for structural stability and durability. Additionally, ensure the desk is compliant with CARB Phase 2 and EPA TSCA Title VI standards for formaldehyde emissions. These certifications are particularly important for home offices where air circulation may be lower than in a commercial building.
How do I prevent "tech neck" during long teaching sessions? To prevent neck and back strain, ensure your monitor is at eye level and that you are sitting in an ergonomic chair with lumbar support. Incorporating a sit-stand desk allows you to change positions throughout the day, which improves circulation and reduces the physical toll of long, stationary teaching blocks. OSHA recommends taking short "micro-breaks" every 20-30 minutes to stretch and rest your eyes.
References
Government / Standards / Regulators
- Computer Workstation Ergonomics - OSHA
- Formaldehyde Emission Standards for Composite Wood Products - EPA
- California Air Resources Board (CARB) - Composite Wood Products
Industry Associations / Research Institutes
- BIFMA Furniture Safety and Performance Standards
- Video Conferencing Best Practices - Industry Report 2026
Academic / Whitepapers / Labs
- Pedagogical Design in Virtual Environments - University Research
- The Impact of Workspace Organization on Teacher Productivity - Academic Study
Platform Official Docs
- Zoom Support: Optimizing Your Video and Audio Settings
- Google Meet: Hardware Requirements for Educators